Not long ago I got to know it's actually possible to build an FM transmitter out of a Raspberry Pi 1, and I thought "Woah! Could I really use it to stream my music to my old car radio system?!"
And guess what? I had a spare RPi laying on my desk and eating the dust, just praying for me to pick it up and do something with it... so I did.
Here's what I expected:
- Stereo Transmission
- MP3 shuffle from USB drive/pen/key
Unfortunately,
Google didn't help me this time, as I found no decent implementation, except for this one, which uses PiFm and claims to be stereo (according to their documentation here, but it’s not.)
I tried few times with their latest version but had no luck: the audio signal was still being sent in mono on my system.
There I got frustrated and started googling around, desperately looking for an explanation , and guess who I found?
This little guy, here, PiFmRDS. I don’t know why didn’t I found it before, but here it is! A perfectly-working stereo FM transmitter + RDS!
that’s actually more than I asked for!
I gave it a try and it behaved just perfect, except for… piping.
I was really happy with pifm’s ability to process pretty much any kind of pipe I was feeding him with, but I couldn’t say the same for PiFmRDS: it caused not few headaches before I was able to stream something (mp3) compressed with it.
Then my journey began: since nobody seems to have built anything around it (I still wonder why) like they did with pifm, after a few mumbling I thought: why don’t I make one?
Then I started (not really) coding for a decent solution for shuffling all the mp3s in a usb drive.
At this point, As I know myself pretty well, I should have known that this was not something I would have stopped working on so early.
The system was working fine, and I was also able to issue the name of the song thru RDS; just nothing to complain. Then I came out with an idea : If it is just working this well, why don’t I make the Raspberry A2DP compatible, so I can stream all of my music directly from my phone?
Of course, back in that moment, I had no idea what kind of issues I was heading to…
When I first found this article on instructables I thought “that’s pretty easy!” , having done that, the step for streaming it thru FM shouldn't be that long... shouldn't be?
Well..
I made a little benefit out of that post, but it wasn’t just enough.
Also specific googling like a dumb didn’t help too much on that subject, since there was too old documentation fooling me around, and hell no, it won’t all work on Debian 8.
To keep it short, here’s my HOW-TO out of dozen hours spent scratching my head, and I hope you could benefit too.
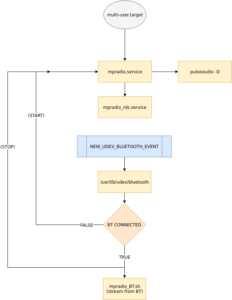
I'm attaching my schematic here to get an overview of what's going on:

Since i'm attaching the full dd image download link too, I will just spend few words on what you can't see from this schematic:
ISSUES & CONFIGS
Since starting pulseaudio daemon (needed for A2DP server) was causing a huge audio quality loss and significant latency, I had to debug what was going on before and after pulseaudio being loaded:

Fortunately, that was quick.
Loading the Pi's audio card driver caused strange consequences that are above my comprehension, but two things were sure:
1) I don't need Pi's audio card driver while streaming with PiFmRDS over GPIO
2) I don't need ipv6 either, do i?
so I disabled both:
/etc/modprobe.d/blacklist.conf
blacklist snd_bcm2835
blacklist ipv6
To handle a bluetooth connection I needed the following in
/etc/udev/rules.d/99-input.rules
KERNEL=="input[0-9]*", RUN+="/usr/lib/udev/bluetooth"
Of course we need to place the bluetooth script in that RUN location
Here's where I took advantage of instructables.
For my implementation I didn't need the full script, but the "name who's connected" part was cool:
#!/bin/bash
echo "Executing bluetooth script...|$ACTION| >> /var/log/bluetooth_dev
ACTION=$(expr "$ACTION" : "\([a-zA-Z]\+\).*")
if [ "$ACTION" = "add" ]
then
echo "BT connected" >> /var/log/bluetooth_dev
for dev in $(find /sys/devices/virtual/input/ -name input*)
do
   if [ -f "$dev/name" ]
   then
      mac=$(cat "$dev/name" | sed 's/:/_/g')
      bluez_dev=bluez_source.$mac
      echo "BT $bluez_dev" >> /var/log/bluetooth_dev
      sleep 1
      CONFIRM=$(/bin/su pi -c "pactl list short| grep $bluez_dev") #Be careful here, this condition might fail.
      if [[ $(echo $CONFIRM) != "" ]]
      then
        echo "Setting bluez_source to:  $bluez_dev" >> /var/log/bluetooth_dev
    systemctl stop mpradio
        /home/pi/mpradio_BT.sh $bluez_dev
      fi
   fi
done
fi

if [ "$ACTION" = "remove" ]
then
systemctl start mpradio
fi
Of course, you need to manually pair your BT device first
# 1) bluetoothctl -a    #opens a shell and register the agent
# 2) agent on
# 3) default-agent
# 4) discoverable yes
# 5) on your mobile device, you should now see the bluetooth to pair
# 6) enter a pincode, which will be asked on the shell side as well.
This has to be done just the first time, like any other regular bluetooth device.
Now let's install some dependencies and take a look at some configuration files:
Install all the BT needed software:
sudo apt-get install bluez pulseaudio-module-bluetooth python-gobject python-gobject-2 bluez-tools
don't forget to
sudo usermod –a –G lp pi
to make it work properly (pi must be authorized)
And edit like here:
/etc/pulse/daemon.conf
 realtime-scheduling = yes
; resample-method = speex-float-3
 resample-method = trivial
 default-sample-rate = 48000
/etc/bluetooth/audio.conf
[General]
Enable=Source,Sink,Media,Socket,Headset
and set BT name/service class
/etc/bluetooth/main.conf
Name = raspberrypi
Class = 0x5a010c
I suggest you to install sox and its dependencies as well, if you wanna shuffle the mp3s on the USB drive.
sudo apt-get install sox
and mount the drive on boot (but don't fail the boot if not present!)
/etc/fstab
/dev/sda1 /pirateradio vfat defaults,nofail 0 0
That's it!
The systemd units names are pretty self-explanatory, so the scripts are.
I'm not pasting the scripts here, though they are essential for this to work.
But that's good! because it means i'm still working on 'em.
So, where can you find those?
If you have any question or need further information, please don't hesitate to ask, and if you found this useful, why don't you buy me a beer? ;-)
Demo video:
DISCLAMER
(from PiFmRDS github page)
[...] In most countries, transmitting radio waves without a state-issued licence specific to the transmission modalities (frequency, power, bandwidth, etc.) is illegal.
Therefore, always connect a shielded transmission line from the RaspberryPi directly to a radio receiver, so as not to emit radio waves. Never use an antenna.
Even if you are a licensed amateur radio operator, using PiFmRds to transmit radio waves on ham frequencies without any filtering between the RaspberryPi and an antenna is most probably illegal because the square-wave carrier is very rich in harmonics, so the bandwidth requirements are likely not met.
I could not be held liable for any misuse of your own Raspberry Pi. Any experiment is made under your own responsibility.
Leggi il contenuto originale su Morrolinux


![[Guida] Eternal Terminal: connessioni SSH persistenti su GNU/Linux](https://www.feedlinux.com/wp-content/uploads/2021/01/eternal-terminal-install-300x139.png)


